

Hello!
It is that time of year, the Easter bunny is so close to hopping by.
We have been reading Easter books, singing songs, talking about why we celebrate Easter and doing LOTS of crafts.
I have documented the 4 crafts we loved the most and thought we would share them with you all today!
The 4 of these are very simple and 3 of them use very basic everyday items you probably have in your house & LuLu had a really good time with them.
There were parts that I helped her with, but for most of it she did everything and picked all the embellishments!
Now for the tutorials…

Easter stamps.
This one would have to be the most simple to create. These stamps turned out surprisingly very good, so cute in fact I got a bunch of plain cards and we made some quick and easy Easter cards for our loved ones!
You will need;
- A paper towel roll or a few toilet rolls.
- Scissors.
- Tape or a stapler.
- Paint.
- Paper or cards.
- Embellishments if you wish to add them to a card.
- For the egg shaped stamp pinch the top of a toilet roll, voila you have an egg shaped stamp.
- The bunny is a little more complex. You need to make 2 egg shaped stamps and attach them to a regular shaped roll. (So 2 ovals attached to a circle)
- You can attach them with a stapler or glue. I found sticky tape was quick & easy.
- Set out your paints & admire how easy this was and how cute your bunnies & eggs look!
-
For our Easter cards we did 3 eggs on one side and 1 bunny on the other. We then added Easter egg sequins & little foam stickers. I think they look so sweet & lovely!


Paper plate bunny.
- Paper plates.
- I used a doily as an added touch of pretty – but it’s not needed, I just had spare.
- Cotton wool balls.
- Plain paper or card.
- Glue.
- Stapler.
- Pipe cleaners.
- Paint.
- Googley eyes – these are also optional but LuLu is obsessed with these eyes lately so every craft project we do needs eyes. You could just paint eyes on.
- Magnets if you wish to hang it on the fridge.
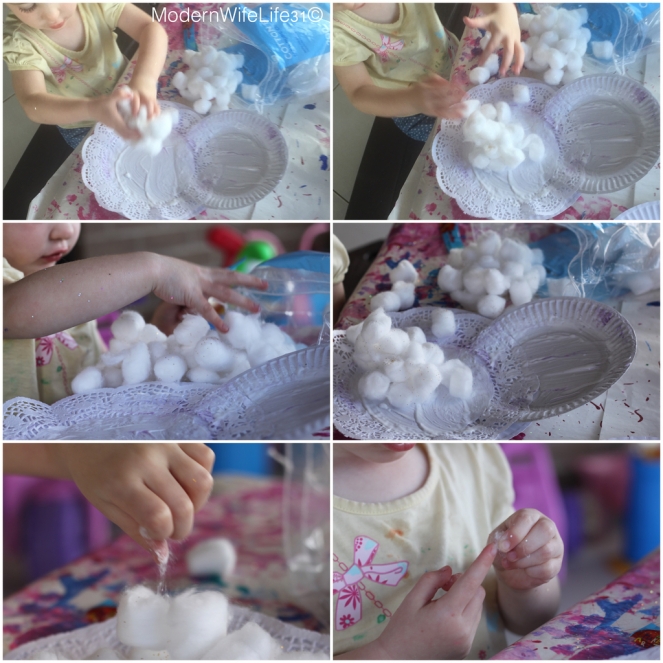
- Attach paper plates to each other (I stapled them) & if using a doily glue that on now.
- Make prints of your little loves feet & hands. You can do this however it is easiest for you. LuLu sat on a step for me and I painted 1 foot at a time & stamped them, then I used a wet wash cloth to wipe her foot clean (we did this inside) & then did the same on her hands. You could also do this outside, but the day we did this was super windy! While the paint is still wet you can sprinkle with glitter if you like.
- While the prints dry, glue cotton balls to the bunny. To do this I just spread glue over the area of the bunny that needed fluff and let LuLu attach the cotton wool balls how she wanted. (Turns out she is just like me and hates the feel of them! But she still loved this craft)
- Once all cotton balls are attached, carefully cut out the feet & hand prints.
- Attach them as shown in the picture. Hands for ears & feet for the bunnies feet.
- Add extra embellishments. Pipe cleaners for whiskers, draw on some eyes or add googley eyes, draw on a mouth and attach a bow.
- Admire your very cute & festive creation. This bunny would be lovely attached with a magnet on the back for Grandparents.


- Styrofoam eggs. I got mine from a cheap shop a few years ago.
- Paint.
- Paint brushes.
- Paint the eggs. LuLu had a lot of fun experimenting with how to paint the eggs.
- Let dry, they dry fairly quickly.
- Display & admire!


- Paper towel or toilet rolls – cardboard tubes.
- Scissors.
- Stapler & sticky tape.
- Paint.
- A marker.
- A cotton wool ball.
- Any embellishments you wish to use. (Glitter & googley eyes are not needed, but in LuLu’s opinion are a must have in any craft project!)
- Cut 2 small sections from the cardboard tube – these will be “the ears”
- Pinch the circles to make ovals.
- Attach the ears to a longer bit of the cardboard tube “the body”.
- Paint & decorate how you wish.
- If you wish to add glitter, do so while the paint is wet. The easiest way I found for us to do this was to hold the tube with my fingers inside & just roll it as LuLu sprinkled the glitter on.
- Add features such as eyes, whiskers, nose & mouth.
- Attach cotton wool ball tail on.
- You now have one very sweet bunny made from something that was probably going to the recycling bin!


These crafts just weren’t fun & wasting time, as we craft I try to encourage LuLu to learn new things. Colours, shapes, how things work, about bunny rabbits etc.
Everything is a learning experience for kids. Craft time is can be extremely beneficial to your child’s brain development.
Some of the benefits of doing crafts include, but aren’t limited to…
- Bilateral Co-ordination; Can be strengthened with crafts.
- Creative skills; Feeling different textures, improving her painting skills & expressing herself with what she likes.
- Cognitive thinking; Understanding cause & effect (mixing colours,) & visual processing.
- Motor skills; painting, sprinkling glitter, controlling tricky objects to paint (cardboard tubes & eggs roll around unlike a flat piece of paper) & helping attach small embellishments.
- Thinking skills; Considering options & making decisions.
- Problem Solving; Working out ways to stop the egg from rolling & how to paint a round object.
- Listening skills; Following instructions.
- Science; That glue is sticky when wet but isn’t when it is dry, round things roll & paint is wet but when we wait & have patience it will dry.
It is also a great time to spend with our children, bonding, talking, working out what colours they like and teaching them things.
Facebook.
Instagram.
Twitter.
Pinterest.
YouTube.
Snapchat; Bindy_30


These are really cute! There is a reason I've been collecting those paper towel rolls! Pinning!
LikeLike